Learn LaTeX in 30 Minutes
This introductory tutorial doesn't require any LaTeX background, but our goal is simple and straightforward: after reading it, you'll not only be able to write your first LaTeX document, but also have enough confidence and foundation for your future LaTeX learning journey—no longer feeling confused, but thinking "I can do this too."
What is LaTeX
(pronounced "lay-tek" or "lah-tek", whichever feels more natural to you) is a powerful tool for typesetting professional documents. But let's be clear upfront: its working method is completely different from the Word, WPS, or LibreOffice you've used before.
Traditional document tools are "What You See Is What You Get" (WYSIWYG)—you see what you write, click the mouse to add bold, change colors, and call it typesetting. LaTeX is "What You Think Is What You Get"—you write a plain text file, insert some magical LaTeX commands to tell the system what effects you want, and finally let the TeX engine handle it.
When you finish typing the code and press the "Compile" button, the computer transforms this "magical plain text" into a beautifully typeset PDF document that could be directly submitted to journals for printing. You only need to focus on writing content; whether the format is beautiful or professional is entirely left to LaTeX and its underlying TeX engine.
In one sentence: You think, the computer does the good work.
Where Does It Come From? Why Is It Trustworthy?
Let's go back to 1978. There was a computer scientist at Stanford University named Donald Knuth. You can Google the details yourself, but here you just need to know this person is a god among gods.
He wrote a monumental book "The Art of Computer Programming," only to find—there was no typesetting system at the time that could typeset this book decently. He was so frustrated that he simply created his own typesetting engine: TeX, from low-level instructions to character spacing algorithms, with insane precision.
But TeX was too powerful and too "low-level," making ordinary people struggle to use it. So later, another genius—Leslie Lamport, wrapped a more user-friendly command system on top of TeX, and this is what we use today: LaTeX ("Lamport + TeX").
So you can understand it like this:
- TeX is the kernel, LaTeX is the operating system
- TeX is responsible for making every page of text beautiful like artwork
- LaTeX is responsible for allowing us ordinary people to write such artwork
After more than 40 years of development, LaTeX has been widely adopted by researchers, engineers, mathematicians, journal editorial offices, and university presses worldwide. The top journal papers, doctoral dissertations, academic books, and technical lecture notes you see are most likely written in LaTeX. It's not "trendy"; on the contrary, it's one of the most classic and reliable technologies.
- Latest stable version:
v3.141592653(January 2021)- TeX's version number has been approaching the mathematical constant π (pi) (like 3.14159265…), but will never exceed it. Author Donald Knuth said this is to pay tribute to the beauty of mathematics and also symbolizes that this system has "infinitely approached perfection."
- He also established a rule: after his death, TeX's version number will finally be fixed at π, with no further changes.
- As for LaTeX's version numbers, they are directly named by date, like 2024-06-01, emphasizing stability and documentation.
So while other software's version numbers say "we still have a lot to fix," LaTeX's version numbers say "I've written it as correctly as possible." It's just very engineering romantic.
Why Learn LaTeX
Regarding whether to learn LaTeX, you could actually list a bunch of pros and cons, but ultimately, this is like whether to eat cilantro—it's your own choice, depending on your habits, preferences, and how high your typesetting requirements are.
Of course, if you really want me to take a side, I'd stand firmly with LaTeX without hesitation, for the following reasons:
- ✅ It can typeset extremely complex mathematical formulas, tables, and various hardcore STEM content, easily handling things that would make Word crash;
- ✅ It's incredibly powerful for "trivial but must-be-correct" things like footnotes, cross-references, and bibliography management;
- ✅ Structures like tables of contents, glossaries, and lists of figures/tables that are tedious and long can be generated with one click in LaTeX, requiring no mental effort;
- ✅ Not to mention, it's essentially a programmable system that can install plugins, be extended, with thousands of free packages to choose from, allowing customization however you want, handling all kinds of "company custom templates" and "journal specified formats."
In summary: LaTeX gives you almost ultimate control over document typesetting, producing that "professional look" when printed. Of course, it also has weaknesses—for example, it's not as good at "magazine-style" pages with "randomly placed images and text." In those cases, you should still use InDesign, don't force it.
Another particularly great advantage of LaTeX is that it clearly separates "content" from "style." You write your content, want to change the appearance? Just change the template, no need to click until your hand cramps.
You can even pre-write a style file, define your own document specifications, and all similar articles in the future can be generated with this "master template" with one click. This is why many academic journals provide LaTeX templates: unified format, unified submission process, saving time and effort.
LoongTeX has a "template dream team" level template library, with thousands of templates, covering everything from research papers, technical reports, academic books, to resumes, and presentations. You just need to open a template, create a new project, and start writing directly—don't worry about formatting, just focus on writing good content.
In short, if you're someone who pursues a good writing experience and professional typesetting results, then LaTeX is really worth your serious consideration. Once you start using it, you might want to say: "😝 How the hell did I only discover this thing now?"
Write Your First LaTeX Work
First step, we need to create a new LaTeX project.
You can create a new .tex file on your own computer, or, for convenience, just create a new project directly on LoongTeX.
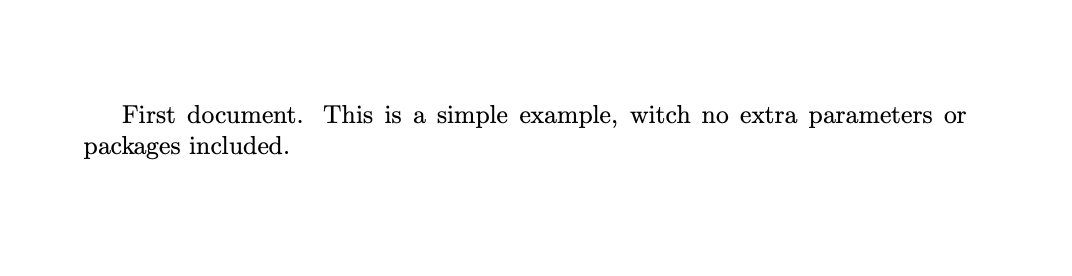
Let's start with the simplest, runnable example—click to run directly in LoongTeX, don't hesitate, just get on board.
\documentclass{article}

\begin{document}
First document. This is a simple example, with no
extra parameters or packages included.
\end{document}
This example will generate a PDF file like this:
You'll notice LaTeX thoughtfully indents the first line of paragraphs for you—it handles all typesetting matters. Let's break down what's happening in this code.
The first line \documentclass{article} means: this is an article-type document. This "class" defines the overall appearance of the entire document.
Different content uses different "classes"—for example, you can't use this for writing a resume; you'd need to choose a specialized cv class; for writing academic papers, you can use the standard article class;
writing a book? Use book; writing a report? Use report. There are many "classes" in the LaTeX world, want to see the full list?
Go treasure hunting at CTAN (a place called "Comprehensive TeX Archive Network"), it's official, comprehensive, and reliable.
After setting the document type, the main content is written between \begin{document} and \end{document}.
You can open the example, modify some text, then click the "Recompile" button on LoongTeX—it will automatically typeset and generate PDF for you.
The experience is different from writing in Word; it's more like a "rigorous typesetting machine," but once you get used to it, it becomes addictive.
If you don't understand, that's okay, there's a short video here, click to see a direct demonstration.
todo:这里是一个视频
In LoongTeX, any project can be set to "compile while writing." Just click the small arrow next to the "Recompile" button, then turn on "Auto Compile"—just like demonstrated in the screenshot below. Say goodbye to manual clicking from now on, just focus on writing.
todo: Here is an image
We just learned how to add content to a document, next we should do some "facade engineering": give your document a proper title. To achieve this, we need to talk a bit about—something in LaTeX that sounds a bit intimidating but is actually simple: the preamble.
Document Preamble
The screenshot above shows how LoongTeX saves a LaTeX document as a file called main.tex. .tex is the standard suffix for writing LaTeX, everyone calls it that, don't ask why, it's industry convention.
In the previous example, we started writing the main content after \begin{document}.
But actually, all content before this belongs to the LaTeX document's "behind-the-scenes configuration area"—the preamble, to put it simply, it's the document's "opening settings."
What do you do in the preamble? Simply put, you set the tone:
- Use
\documentclassto tell LaTeX what type of document you're writing (e.g., article, report, slides); - Set the document language;
- Load various function packages you need (these things are like installing plugins for Word, we'll explain in detail later);
- And various configuration items, everything adjustable is adjusted here.
If you want to start with the most minimal configuration, a basic preamble might look like this:
\documentclass[12pt, letterpaper]{article}
\usepackage{graphicx}
其中这行代码:
\documentclass[12pt, letterpaper]{article}
What does it mean? In one sentence: This is telling LaTeX, "I want to write an article (article type), font size 12pt, paper size American standard letter paper (letterpaper)."
These two parameters are written in square brackets, multiple parameters separated by English commas, specifically used for personalized configuration of this article-type document. Like ordering takeout, article is the main dish, 12pt and letterpaper are adding spice and no cilantro.
Specifically, let's see what these two parameters do:
12pt: Adjusts the default font size to 12pt, one size larger than the default 10pt, suitable for situations where eyesight isn't great or the boss requires larger font sizes;letterpaper: Sets the paper size to American standard letter paper (8.5 x 11 inches), of course you can also choosea4paper(national standard) orlegalpaper(a longer paper).
What other font sizes can you choose? Common ones are 9pt, 10pt, 11pt, 12pt, if not specifically specified, the default is 10pt.
If you want to deeply understand issues like page dimensions and margins, we recommend checking out our page setup and margin configuration article, very practical, suitable for perfectionists to master deeply.
Loading Function Packages: Making LaTeX More Powerful
This line:
\usepackage{graphicx}
is a typical example, meaning "load an external function package called graphicx."
What's this package for? Simple and direct: enables LaTeX to support inserting images. Without it, forget about inserting images, LaTeX can't even recognize a picture—like primitive humans writing papers.
Many of LaTeX's functions are extended through "packages." If you want to learn more about how to find and use packages, check out our article "LaTeX Function Package Guide," you'll regret not reading it.
Setting Title, Author, Date: Basic Courtesy of Documents
To add title, author, and date to your document, just write three more lines of code in the preamble (note, not in the main text), respectively:
-
\title{My first LaTeX document}: Article title, write something decent, not embarrassing stuff like "Untitled 1." -
\author{Hubert Farnsworth}: Author name goes here. If you want to add a footnote below thanking sponsors, advisors, or bosses, you can use\thanks{}.\thanks{Funded by the LoongTeX team.}: This is it, placed after the author name, write what you want to say in the curly braces. LaTeX will automatically add a superscript + footnote, elegant and professional, suitable for "acknowledging" in papers.
-
\date{August 2022}: Date you can fill in yourself, or use\today, automatically becomes today's date each time you compile, suitable for lazy people, perfectionists, and night owls who submit at the last second.
After adding these lines, your preamble will look roughly like this:
\documentclass[12pt, letterpaper]{article}
\title{My first LaTeX document}
\author{Hubert Farnsworth\thanks{Funded by the LoongTeX team.}}
\date{August 2022}
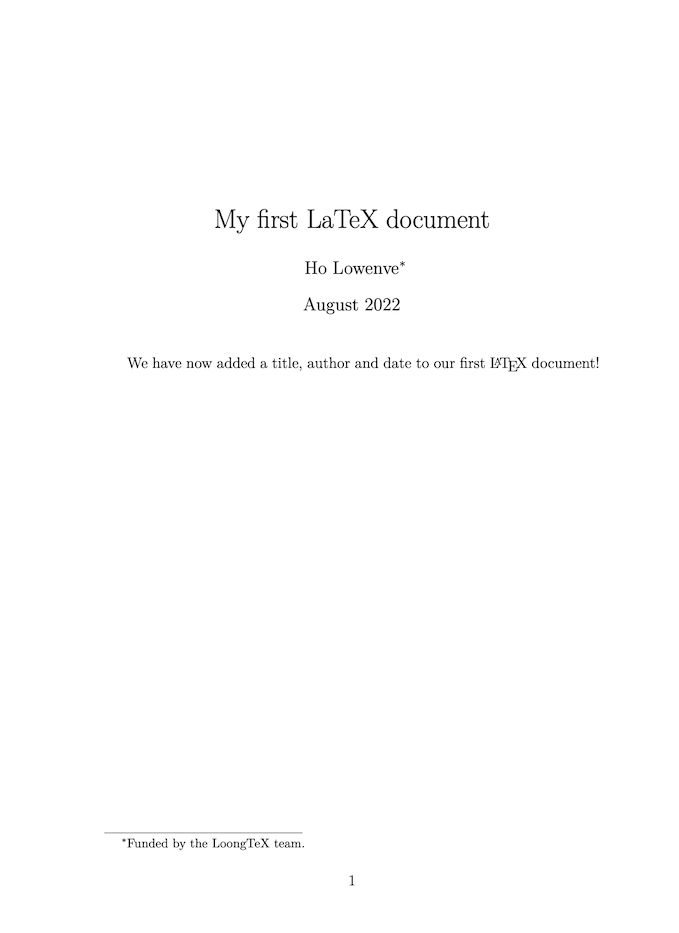
To actually "print" the title, author, and date onto the page, just add one line in the main text: \maketitle.
\begin{document}
\maketitle
We have now added a title, author and date to our first \LaTeX{} document!
\end{document}
Now, with both the preamble and main text sections complete, you have a fully usable LaTeX document that can be directly thrown into LoongTeX and run—ready to use out of the box, zero configuration required.
\documentclass[12pt, letterpaper]{article}
\title{My first LaTeX document}
\author{Hubert Farnsworth\thanks{Funded by the Overleaf team.}}
\date{August 2022}
\begin{document}
\maketitle
We have now added a title, author and date to our first \LaTeX{} document!
\end{document}
The output of this example is as follows:
Adding Comments
LaTeX can actually be seen as a "programming language focused on typesetting." Since it's "writing code," there's a universal good habit—adding comments.
Comments in LaTeX won't appear in the typesetting results and have no impact on the final document. Their function is just like comments when you write code: can record "to do" lists, explain complex macro commands, or temporarily disable certain content during debugging to prevent issues.
So how do you write comments? In one sentence: Add a % at the beginning of the line.
For example, the following code is a living example: any line with % will be completely ignored by LaTeX, not even looked at, like an honest person ignoring social media ads.
\documentclass[12pt, letterpaper]{article}
\title{My first LaTeX document}
\author{Hubert Farnsworth\thanks{Funded by the Overleaf team.}}
\date{August 2022}
\begin{document}
\maketitle
We have now added a title, author and date to our first \LaTeX{} document!

% This line here is a comment. It will not be typeset in the document.
\end{document}
The output of this example is exactly the same as the previous LaTeX code without comments.
—So feel free to add % boldly, it's only for humans to see, LaTeX won't pay any attention to it.
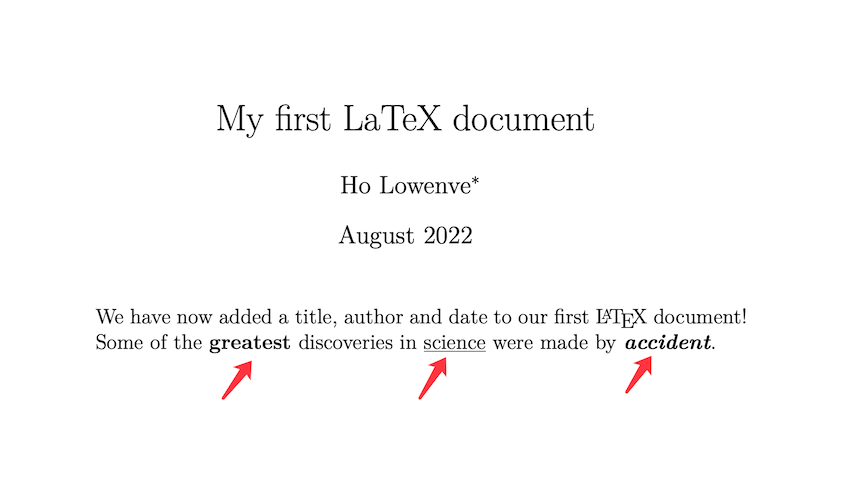
Bold, Italics, and Underlining
Next, let's look at some of the most commonly used and "prestigious" text formatting commands in LaTeX.
- Bold: Use
\textbf{...}, for emphasis, shouting, suitable for key concepts or subheadings. - Italics: Use
\textit{...}, suitable for citations, terminology, or "pretending to be literary." - /Underline/: Use
\underline{...}, use with caution, although it can draw lines, it's not very elegant, and if used poorly, it resembles elementary school compositions.
The following code is a "practical demonstration" of these commands: you can see the effects and also copy them directly.
Some of the \textbf{greatest}
discoveries in \underline{science}
were made by \textbf{\textit{accident}}.
The output of this example is as follows:
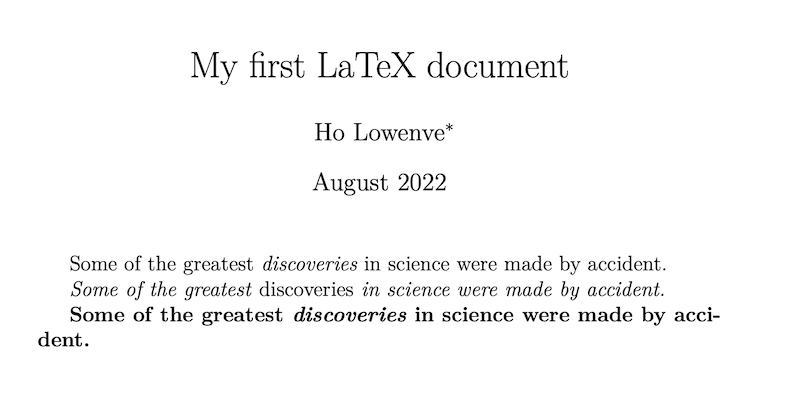
Another very practical command is \emph{...}, meaning "emphasize" a piece of text.
It's somewhat intelligent, the emphasis method automatically adjusts based on context:
- If used in regular text, it turns the text into italics;
- But if you use it in an already italicized paragraph, it instead changes back to normal text, highlighting the emphasis.
Simply put: it knows in which context "emphasis" has impact. The following code is a classic demonstration, you'll understand after using it once.
Some of the greatest \emph{discoveries} in science
were made by accident.

\textit{Some of the greatest \emph{discoveries}
in science were made by accident.}

\textbf{Some of the greatest \emph{discoveries}
in science were made by accident.}
The output of this example is as follows.
Note: Some LaTeX function packages, like Beamer (the one used for slides), will override
\emph's default behavior.
For example, it might change emphasized text to bold, change colors, or even add animation effects—in short, no longer the "italic emphasis" you see in regular articles. So when using specific templates or macro packages, it's best to check in advance what
\emphactually does, so you don't think you're "gently emphasizing" only to find it's turned into "spotlight shouting."
Inserting Images: Making Your Document Not "All Text"
In this section, let's talk about—how to insert images in LaTeX. Don't worry, LoongTeX provides you with three methods, both manual and visual, there's always one suitable for you:
- Click Button to Insert Image: Click the "Insert Figure" button on the editor toolbar, applicable to both Visual Editor and Code Editor, works on both sides;
- Copy-Paste Images: Directly paste images into the editor, a blessing for lazy people, LoongTeX will automatically generate the corresponding LaTeX code for you;
- Write Code to Insert Images: Use Code Editor to manually type LaTeX code, more flexible, more professional, suitable for hands-on users.
The first two methods automatically generate code, but here we mainly introduce the 3rd method—writing code to insert images yourself. Remember: Images must be uploaded to your LoongTeX project, otherwise LaTeX won't find them.
Below is a standard example showing how to elegantly embed images into documents:
\documentclass{article}
\usepackage{graphicx} % LaTeX package for importing graphics
\graphicspath{{images/}} % Configure the Graphicx package

\begin{document}
The universe is immense and it seems to be homogeneous,
on a large scale, everywhere we look.

% The \includegraphcs command is
% provided (implemented) by the
% graphicx package
\includegraphics{universe}

There's a picture of a galaxy above.
\end{document}
The output of this example is as follows:
todo:这里是一个配图
To insert images in a LaTeX document, just knowing the commands isn't enough—you first need to load an "external function package", that is, a toolkit specifically for handling image imports.
In the example we mentioned earlier, the package loaded is graphicx, which provides two very crucial commands:
\includegraphics{...}: Insert the image;\graphicspath{...}: Tell LaTeX, "Hey, my images are here," don't search randomly.
To use this package, you need to add one line in the preamble:
\usepackage{graphicx}
Then, if you want to manage image files more clearly, for example, if you put all images in a folder called images/, you can add this line:
\graphicspath{{images/}}
This means telling LaTeX: "Brother, don't randomly search through the file pile for images, I've put them all in the images/ folder."
—With these two steps, your illustration system is "armed to the teeth," next just confidently use \includegraphics{} to call images in.
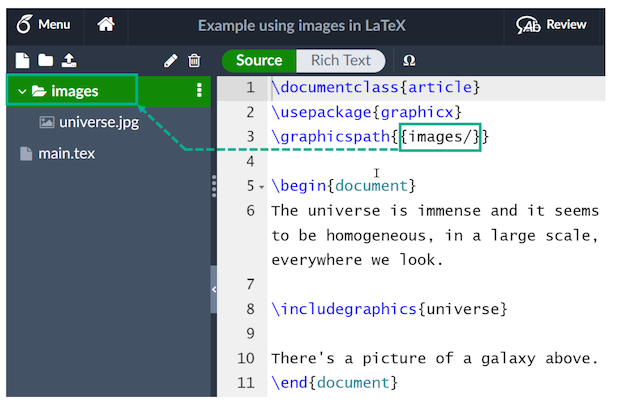
The command \includegraphics{universe} is the step that actually inserts the image into the document. Here universe is the name of the image file, but without the file extension (like .png, .jpg, etc.).
💡 Note a few points:
- Although you can write
\includegraphics{universe.png}, it's recommended to write without the extension. This way LaTeX will search for supported formats itself, like PDF, PNG, JPG, EPS... if found, use it; if not found, then report an error, more flexible and compatible.- Don't have spaces in filenames, and don't use multiple periods (like
my.graphic.final.pngis very dangerous). When uploading images to LoongTeX, we also recommend using lowercase extensions, likelogo.png,data.jpg, don't use styles like.PNGwith mixed case, it's prone to issues.
📚 Want to learn more about LaTeX packages? Don't worry, at the end of this tutorial we specifically talk about how to "find and use LaTeX packages," letting you use them clearly and steadily.
Titles, Labels, and References
Images can be explained, annotated, and referenced through figure environments, as shown below:
\documentclass{article}
\usepackage{graphicx}
\graphicspath{{images/}}

\begin{document}

\begin{figure}[h]
    \centering
    \includegraphics[width=0.75\textwidth]{mesh}
    \caption{A nice plot.}
    \label{fig:mesh1}
\end{figure}

As you can see in figure \ref{fig:mesh1}, the function grows near the origin. This example is on page \pageref{fig:mesh1}.

\end{document}
The output of this example is as follows:

In this example, there are several noteworthy commands:
\includegraphics[width=0.75\textwidth]{mesh}: This form of\includegraphicsinstructs LaTeX to set the graphic's width to 75% of the text width, and the text width value is stored in the\textwidthcommand.\caption{A nice plot.}: As the name suggests, this command sets the figure's caption, which can be placed above or below the figure. If you create a list of figures, this caption will be used in that list.\label{fig:mesh1}: To reference this image in your document, you can use the\labelcommand to give it a label. This label is used to generate a number for the image and, combined with the next command, allows you to reference it.\ref{fig:mesh1}: This code will be replaced by the number corresponding to the referenced figure.
Images included in LaTeX documents should be placed in a figure environment, or similar environment, so LaTeX can automatically place the image in an appropriate position in the document.
More guidance can be found in the following Overleaf help articles.
Creating Lists in LaTeX
You can use environments to create different types of lists. Environments are used to encapsulate LaTeX code needed to implement specific typesetting functions. An environment starts with \begin{environment-name} and ends with \end{environment-name}, where environment-name could be figure, table, or one of the list types: itemize for unordered lists, enumerate for ordered lists.
Unordered Lists
Unordered lists are produced by the itemize environment. Each list entry must be preceded by the \item command, as shown below:
\documentclass{article}
\begin{document}
\begin{itemize}
  \item The individual entries are indicated with a black dot, a so-called bullet.
  \item The text in the entries may be of any length.
\end{itemize}
\end{document}
The output of this example is as follows:
![]()
You can also open this larger LoongTeX project, which demonstrates various types of LaTeX lists.
Ordered Lists
Ordered lists use the same syntax as unordered lists but are created using the enumerate environment:
\documentclass{article}
\begin{document}
\begin{enumerate}
  \item This is the first entry in our list.
  \item The list numbers increase with each entry we add.
\end{enumerate}
\end{document}
The output of this example is as follows:
![]()
As with unordered lists, each entry must be preceded by the \item command. Here, it automatically generates numbered ordered list label values, starting from 1.
To learn more, you can open this larger LoongTeX project, which demonstrates various types of LaTeX lists, or visit our dedicated help article on LaTeX lists, which provides more examples and shows how to create custom lists.
Adding Mathematical Operations to LaTeX
One of LaTeX's main advantages is the ease of writing mathematical expressions. LaTeX provides two writing modes for mathematical typesetting.
-
Inline math mode: Used for writing formulas that are part of a paragraph
-
Display math mode: Used for writing expressions that are not part of the text or paragraph, and are typeset on separate lines.
Inline Math Mode
Let's look at an example of inline math mode:
\documentclass[12pt, letterpaper]{article}
\begin{document}
In physics, the mass-energy equivalence is stated
by the equation $E=mc^2$, discovered in 1905 by Albert Einstein.
\end{document}
The output of this example is as follows:
![]()
To typeset inline math, you can use one of these delimiter pairs: \(...\), $ ... $ or \begin{math} ... \end{math}, as shown in the example below:
\documentclass[12pt, letterpaper]{article}
\begin{document}
\begin{math}
E=mc^2
\end{math} is typeset in a paragraph using inline math mode---as is $E=mc^2$, and so too is \(E=mc^2\).
\end{document}
The output of this example is as follows:
![]()
Display Math Mode
Equations typeset in display mode can be numbered or unnumbered, as shown below:
\documentclass[12pt, letterpaper]{article}
\begin{document}
The mass-energy equivalence is described by the famous equation
\[ E=mc^2 \] discovered in 1905 by Albert Einstein.

In natural units ($c = 1$), the formula expresses the identity
\begin{equation}
E=m
\end{equation}
\end{document}
The output of this example is as follows:

To typeset display mode mathematics, you can use one of these delimiter pairs: \[ ... \], \begin{displaymath} ... \end{displaymath} or \begin{equation} ... \end{equation}. Historically, typesetting display mode mathematics required using ......here display math......$$, but this method is no longer recommended: use LaTeX's delimiter [ ... ]` instead.
More Complete Example
The following example demonstrates a series of mathematical content typeset using LaTeX:
\documentclass{article}
\begin{document}
Subscripts in math mode are written as $a_b$ and superscripts are written as $a^b$. These can be combined and nested to write expressions such as

\[ T^{i_1 i_2 \dots i_p}_{j_1 j_2 \dots j_q} = T(x^{i_1},\dots,x^{i_p},e_{j_1},\dots,e_{j_q}) \]

We write integrals using $\int$ and fractions using $\frac{a}{b}$. Limits are placed on integrals using superscripts and subscripts:

\[ \int_0^1 \frac{dx}{e^x} =  \frac{e-1}{e} \]

Lower case Greek letters are written as $\omega$ $\delta$ etc. while upper case Greek letters are written as $\Omega$ $\Delta$.

Mathematical operators are prefixed with a backslash as $\sin(\beta)$, $\cos(\alpha)$, $\log(x)$ etc.
\end{document}
The output of this example is as follows:

The next example uses the equation* environment provided by the amsmath package, so we need to add the following line to our document preamble:
\usepackage{amsmath}% For the equation* environment
For further information about using amsmath, see our help article:
\documentclass{article}
\usepackage{amsmath}% For the equation* environment
\begin{document}
\section{First example}

The well-known Pythagorean theorem \(x^2 + y^2 = z^2\) was proved to be invalid for other exponents, meaning the next equation has no integer solutions for \(n>2\):

\[ x^n + y^n = z^n \]

\section{Second example}

This is a simple math expression \(\sqrt{x^2+1}\) inside text.
And this is also the same:
\begin{math}
\sqrt{x^2+1}
\end{math}
but by using another command.

This is a simple math expression without numbering
\[\sqrt{x^2+1}\]
separated from text.

This is also the same:
\begin{displaymath}
\sqrt{x^2+1}
\end{displaymath}

\ldots and this:
\begin{equation*}
\sqrt{x^2+1}
\end{equation*}
\end{document}
LoongTeX — Making Research Happen Better
FOR TRUTH AND BEAUTY